29 Oct 2014
This post is mostly a follow up to my guide on updating other HP ProBook BIOS in a task sequence. If you haven’t read that, this might not be of too much use to you!
The Problem
When updating a HP ProBook 650 G1 BIOS, I ran into a couple of small issues. This mostly related to an undocumented switch being required for the HPBIOSUPDREC tool. The BIOS update would always cause the computer to perform an unexpected reboot, which would break the task sequence.
The command line I was using was:
HPBIOSUPDREC.exe -s -pBIOSPW.bin -fL77_0120.bin
This would cause the BIOS to update, but then the computer would reboot without returning an exit code to SCCM, causing the task sequence to fail. Searching around, I found this post on the HP support forums, which pointed me in the right direction. Thanks richard429!
The Solution
The correct command line to update the HP BIOS for the ProBook 650 G1 is as follows:
HPBIOSUPDREC.exe -s -r -pBIOSPW.bin -fL77_0120.bin
This -r switch appears to be undocumented, which is a shame really, but this prevents the reboot without exit code. The command now returns a correct exit code and lets SCCM reboot the computer gracefully.
Putting it into Practice
In the SCCM package, I’ve placed both the HPBIOSUPDREC tool and the BIOS binary file. The task sequence runs it as shown below:
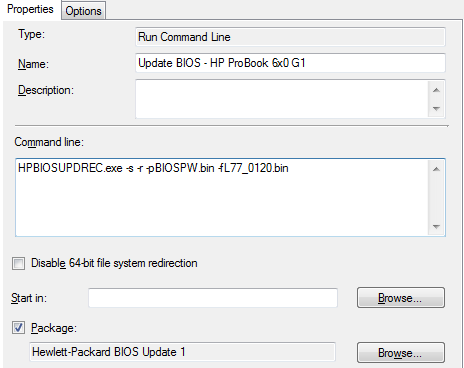
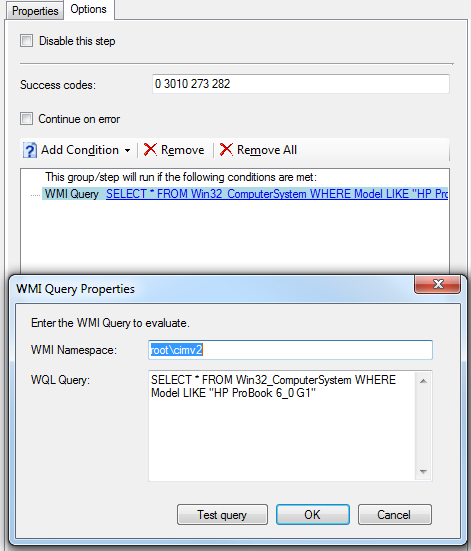
The WMI query makes sure it only runs on the selected/supported HP ProBook 640 G1 and 650 G1’s we have in our environment. There’s no danger in making this query less specific, as the update tool will only flash machines that the update is applicable to. I have also added the exit codes 273 and 282, which are exit codes for “BIOS is already same version” (273) and BIOS installed is newer than the one set to install (272).
27 Aug 2014
A quick followup to my earlier post on the SCEP 2012 ADMX template, I was working today with our Citrix environment and needed to remove visibility of the SCEP client interface.
Fortunately, there is an option in the SCCM Endpoint Protection policies, so I know the functionality to do this is there. This doesn’t seem to have been an option in Forefront Endpoint Protection (FEP) 2010, otherwise it would have been in the original policy template.
The value for this is ”UILockdown” and is found next to the other UX configuration settings for SCEP:
HKLM\Software\Policies\Microsoft\Microsoft Antimalware\UX Configuration\UILockdown

(1 for disabled, 0 for enabled)
I’ve updated the ADMX template to make this new setting visible, the changes I’ve made to the template are here for the ADMX and here for the ADML.
The files can be downloaded here. I’ll also continue to update the template as I find other settings that weren’t present in FEP 2010.
02 Aug 2014
It’s a quick little script I just had to write, after my testing today ran into the minor issue of a flat battery… halfway through the Operating System Deployment (OSD) process.
It’s a little PowerShell script, very similar to the last one that just pops up a box asking you to plug-in the laptop if you are running on battery. I haven’t put much in the way of validation that the device is actually a laptop with a battery, but since my OSD task sequences have a laptop/desktop divide, it’s not too much of a problem!
Here’s the script, the setup instructions are similar to the earlier script, with a different name and a call to a batch file instead of the ServiceUI command.
The batch script contains the command to run ServiceUI, after deciding which copy to run the PowerShell script with, based on the boot image architecture (x86/x64). I’ve put this in at the beginning of the task sequence, once the laptop has booted to the boot image, so we can get the user input or error states dealt with up front.
01 Aug 2014
If you’ve come to this post directly, it’s probably useful for you to read through both part 1 and part 2! If however you’ve already got that under your belt, read on…
As a recap, you’ll remember that I decided to set up two packages for the configuring and updating of the BIOS. Just in case you want a reference for the BIOS update portaion of the structure, here it is again.
SCCMSources\OSD\Packages\BIOSUpdate\HP Probook
    BIOSPW.bin              (Encrypted BIOS password)
    HPBIOSUPDREC.exe        (New BIOS update utility)
    hpqFlash.exe            (Old BIOS update utility)
    ProBook6x70bBIOS.cab    (HP Probook 6x70b BIOS file)
Updating the BIOS
This time, most of the hard work is actually done in the Operating System Deployment (OSD) task. The task needs to be set up to call the BIOS flash tool (Either HPBIOSUPDREC.exe or hpqFlash.exe (depending on the BIOS you need to flash). For the 6x70b’s, hpqFlash.exe is the one to use! The call to the BIOS flash tool follows the following syntaxes.
hpqFlash
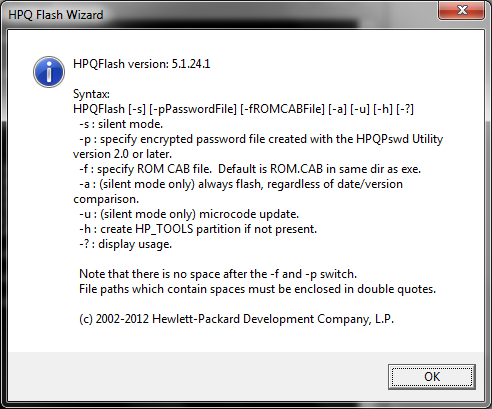
As you can guess, the most interesting command line switches to me are -s -p and -f. Please note, I have not tested and am not 100% sure of the other switches. I can imagine -a could be especially dangerous, so please take care!
HPBIOSUPDREC
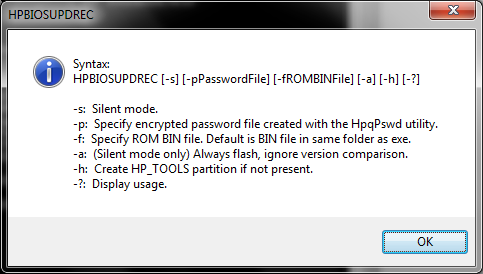
You can see that the switches are exactly the same here, minus the microcode update switch. This is good, as it will make things easier if we automate the selection of flashing tool to use in the future.
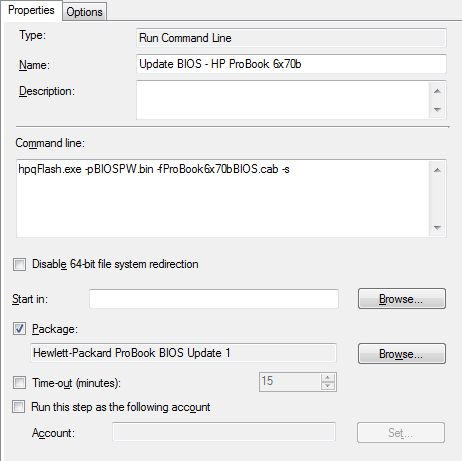
This is run in the SCCM task sequence, just after the reboot for configuring the BIOS, but again before provisioning or enabling Bitlocker. Again, there should be a “Restart Computer” task directly after this to finalise the update procedure. As you can see, hpqFlash is called directly with the BIOS password and the cab file to install, as well as the silent switch.
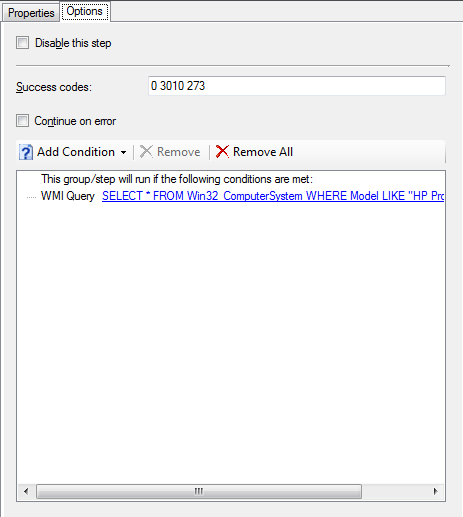
As per the BIOS configuration task, it is based on the computer model name, so that we dont try to flash an incompatible BIOS. If inconsistencies were found that required a different BIOS for the same model, a seperate task could be created with an additional WMI query to obtain another identifying value. You may also see that an additional success code is added (273) this is the code returned by hpqFlash if the BIOS is already up to date and no action is taken. This allows the task sequence to continue as normal if the BIOS is already up to date.
Again, I hope this has been a helpful guide on your path to automating some of the more annoying parts of the imaging process, usually left as manual tasks. As I’ve said before, please let me know if you’ve got a better way of doing things, or have found some innacuracies with my posts and I’ll sort it out.
01 Aug 2014
If you’ve come to this post directly, you may want to read through part 1! If not, read on…
In this part, we’ll cover putting the files we’ve got together in a couple of packages and putting them into a task sequence. We’ll also be using WMI to query the computer model, so we don’t try updating the BIOS on a machine it certainly won’t work on.
I’ve set up the files I need in the following hierarchy, and spread the BIOS configuration and update over two packages. You may decide to do it differently.
SCCMSources\OSD\Packages\BIOSConfig\HP ProBook

    BiosConfigUtility.exe   (BIOS configuration utility - x86)
    BiosConfigUtility64.exe (BIOS configuration utility - x64)
    BIOSPW.bin              (Encrypted BIOS password)
    ProBook6x70bConfig.cfg  (BIOS configuration settings)
    ProBook6x70bConfig.cmd  (BIOS configuration command file)

SCCMSources\OSD\Packages\BIOSUpdate\HP Probook

    BIOSPW.bin              (Encrypted BIOS password)
    HPBIOSUPDREC.exe        (New BIOS update utility)
    hpqFlash.exe            (Old BIOS update utility)
    ProBook6x70bBIOS.cab    (HP Probook 6x70b BIOS file)
NOTE
“SCCMSources” is my network share I store the SCCM source files to use as the content location for applications and packages. I then have “OSD\Packages” to differentiate these packages as being primarily for OSD task sequences. Hopefully the “BIOSUpdate” and “BIOSConfig” folders will eventually house many folders for different types of laptop, but at the moment it’s a bit bare.
Configuring the BIOS
Most of the magic for configuring the BIOS is done in the file ProBook6x70bConfig.cmd
This batch file picks the correct version of BiosConfigUtility to run (x86 or x64), then runs it with the configuration file. It runs it first, attempting to get access to the BIOS using a blank password, then set the password along with the configuration. If this completes successfully (exit code 0), that’s it!
However if it fails for some reason (i.e. there’s a BIOS password set) It then runs the second command, which attempts to set the configuration, using the current password. I’ve yet to properly test a parameterized version of this, to allow the configuration to be specified outside of the batch file.
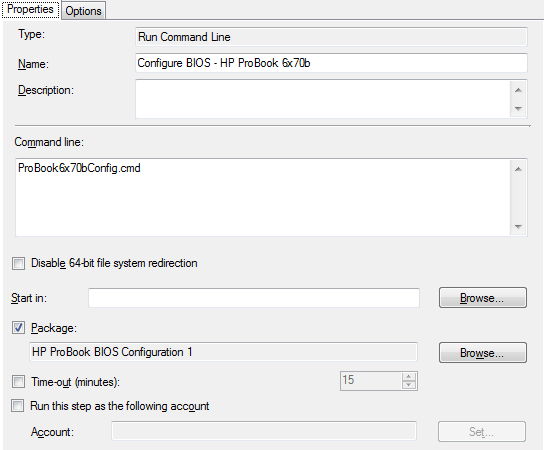
This is run in the SCCM task sequence, at the beginning, before provisioning or enabling Bitlocker, but after formatting the drive, so that on the reboot that occurs directly afterward, using an “Restart Computer” task, the boot image can be successfully staged to the hard disk.
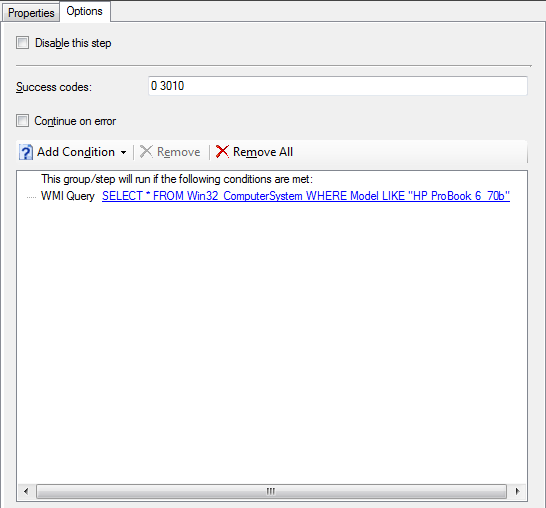
The options base the running of this task on the computer model name, so that we dont try to configure an incompatible BIOS or some other crazy situation. It’s not too clear in the image, but I’m using the single character wildcard “_” in the model - “SELECT * FROM Win32_ComputerSystem WHERE Model LIKE “HP ProBook 6_70b””
Hopefully this has covered everything that’s needed for yourself to go forth and configure the HP ProBook BIOS in an unattended way! As with most of my posts, please let me know if you’ve discovered improvements or inaccuracies and I’ll attempt to right them!
Read on, where I cover the flashing of the BIOS in part three.


