12 Aug 2018
Oh my, what a great day! I met loads of great people and in general had a great day with many many ideas to take back to work!
Things started well with the keynote by Richard Siddaway, on his birthday, no less! He gave a great session on where we are, what we’re here for and also a bit on where we’re going, as well as a great call to action, that consisted of contribute, contribute, contribute!
Right after a quick break, I gave my Test-Business session, which was nervewracking, but ultimately really good (i think?!). I had some great feedback afterward that really made my day. As long as someone is interested to try my code, I’m happy. Slides and content are on GitHub.
I’m planning to also do a bit of cleanup and release the module soon as a preview module on the PowerShell Gallery.
The rest of the day was a blur of amazing sessions, speaking to amazing people and a quick jaunt to a pub for a bit more of a geek session! In no particular order, my takeaways were:
- Some excellent tips on Pester mocking from Mark Wragg
- Wonderful quotes from a DevOps culture presentation by Edward Pearson (plus loads of book recommendations!).
- Very interesting ‘Notes from the field at Jaguar Land Rover’ from James O’Neill
- Some great chats with a bunch of people including James Ruskin, Gael Colas and a quick chat with a guy that came all the way from Australia!
All in all, a magic day, many great people and one of the best days (and the best conference) I’ve ever been to!
Major thanks to the organisers Jonathan Medd, Daniel Krebs, Ryan Yates and all the other people that made this possible!
10 Aug 2018
It’s been a couple of months and I’m back with new learning from the ever busy front where i’m at war with my own ignorance!
I’ve been having a look recently at quite a few web APIs (REST and SOAP and all that) and I’m here to share some slightly whacky odd script for getting Workday data from their SOAP API. For those that don’t know, Workday is a SaaS Human Capital Management (HCM) system with some grand ambitions around employee lifecycles, payroll, expenses and all those buzzwords and things you need to do when you employ people, pretty cool.
So looking at the Workday API pages, you might think SOAP? that’s old school!, use REST! For Workday, fortunately there is a REST API that’s easy to get to grips with, however it’s very difficult to get the security right and automate the login/authorization piece (at least with PowerShell, or my knowledge thereof). This means I’ve been concentrating on the SOAP API, which seems harder to set up the query, but a bit more usable from my position and security standpoint.
OK, so a SOAP API - New-WebServiceProxy to the rescue? Again, not much luck. For some reason I cannot get it to authenticate requests, so I had to fall back on good old Invoke-WebRequest for this one! The user account you use needs to be set up the same way as the system integration user defined here.
Essentially, I took a bunch of syntax for queries that already worked and amalgamated them in one string replacement hackfest. It’s not the cleanest piece of work in the world, but it gets the job done and allows me to keep trying New-WebServiceProxy in the background until I get that working. Any suggestions? Please let me know!
Here’s the function to get the data, you can delve into the returned object and get a load of good data out. I’ll clean up a function for exposing the object in a nice way too at some point soon, hopefully I can get to the point where I can release the entire module!
function GetWDWorkerData {
    <#
        .Synopsis
        A function to construct and send a SOAP request to Workday to retrieve worker data from the Workday API.

        .Description
        A function to construct and send a SOAP request to Workday to retrieve worker data from the Workday API.

        .Parameter Credential
        The credentials required to access the Workday API.

        .Parameter RequestType
        The type of data you would like to retrieve. Defaults to returning all data.

        RequestType can be one of the following:

            Contact
            Employment
            Management
            Organization
            Photo

        .Parameter WorkerID
        Limit your search data to a single worker. If your request encompasses multiple workers, use the pipeline.

        By default all worker information is returned.

        .Parameter Tenant

        The tenant to query for information.

        .Example
        GetWDWorker -Credential (Get-Credential) -Tenant TENANT -RequestType Contact

        Get contact data about all workers from the TENANT environment.

        .Notes
        Author: David Green
    #>
    [CmdletBinding()]
    Param (
        [Parameter(Mandatory)]
        [string]
        $Tenant,

        [Parameter(Mandatory)]
        [pscredential]
        $Credential,

        [Parameter(Mandatory)]
        [ValidateSet(
            'Contact',
            'Employment',
            'Management',
            'Organization',
            'Photo'
        )]
        [string[]]
        $RequestType,

        [Parameter()]
        [ValidateScript( {
                $_ -lt 1000 -and $_ -gt 0
            })]
        [int]
        $RecordsPerPage = 750,

        [Parameter(ValueFromPipeline)]
        [string]
        $WorkerID
    )

    Process {
        $page = 0

        do {
            $page++
            $Query = @{
                Uri             = "https://wd3-services1.myworkday.com/ccx/service/$Tenant/Human_Resources/v30.2"
                Method          = 'POST'
                UseBasicParsing = $true
                Body            = @"
<?xml version="1.0" encoding="utf-8"?>
<env:Envelope
    xmlns:env="http://schemas.xmlsoap.org/soap/envelope/"
    xmlns:xsd="http://www.w3.org/2001/XMLSchema"
    xmlns:wsse="http://docs.oasis-open.org/wss/2004/01/oasis-200401-wss-wssecurity-secext-1.0.xsd">
    <env:Header>
        <wsse:Security env:mustUnderstand="1">
            <wsse:UsernameToken>
                <wsse:Username>$($Credential.UserName)</wsse:Username>
                <wsse:Password
                    Type="http://docs.oasis-open.org/wss/2004/01/oasis-200401-wss-username-token-profile-1.0#PasswordText">$($Credential.GetNetworkCredential().Password)</wsse:Password>
            </wsse:UsernameToken>
        </wsse:Security>
    </env:Header>
    <env:Body>
        <wd:Get_Workers_Request xmlns:wd="urn:com.workday/bsvc" wd:version="v30.2">
       $(if ($WorkerID) { @"
    <wd:Request_References wd:Skip_Non_Existing_Instances="true">
                <wd:Worker_Reference>
                    <wd:ID wd:type="Employee_ID">$($WorkerID)</wd:ID>
                </wd:Worker_Reference>
            </wd:Request_References>
"@ })
            <wd:Response_Filter>
                <wd:Page>$($page)</wd:Page>
                <wd:Count>$($RecordsPerPage)</wd:Count>
            </wd:Response_Filter>
            <wd:Response_Group>
                $(switch ($RequestType) {
                    'Contact' { "<wd:Include_Personal_Information>true</wd:Include_Personal_Information>" }
                    'Employment' { "<wd:Include_Employment_Information>true</wd:Include_Employment_Information>" }
                    'Management' { "<wd:Include_Management_Chain_Data>true</wd:Include_Management_Chain_Data>" }
                    'Organization' { "<wd:Include_Organizations>true</wd:Include_Organizations>" }
                    'Photo' { "<wd:Include_Photo>true</wd:Include_Photo>" }
                })
            </wd:Response_Group>
        </wd:Get_Workers_Request>
    </env:Body>
</env:Envelope>
"@
                ContentType     = 'text/xml; charset=utf-8'
            }

            [xml]$xmlresponse = Invoke-WebRequest @Query
            Write-Verbose -Message $Query.Uri

            if ($xmlresponse) {
                $xmlresponse
                $ResultStatus = $xmlresponse.Envelope.Body.Get_Workers_Response.Response_Results
                [int]$Records += [int]$ResultStatus.Page_Results
                Write-Verbose -Message "$Records/$($ResultStatus.Total_Results) records retrieved."
                Write-Verbose -Message "$($ResultStatus.Page_Results) records this page ($($ResultStatus.Page)/$($ResultStatus.Total_Pages))."
                $TotalPages = $ResultStatus.Total_Pages
            }
        }
        while ($page -lt $TotalPages)
    }
}
09 Aug 2018
Managing client content in SCCM is usually a zero touch affair. You set the content size and the data usually manages itself as it ages out over time and makes way for newer content. However, sometimes an application come along to break all those assumptions and make you cringe.
I recently had to deploy an application that required me to do just that. Two halves of an application, with the larger piece being a svelte 20GB of install content, even when compressed!
This required me to do two things to ensure the SCCM clients wouldn’t run into too many problems, especially if they’d been recently deployed.
One thing was to force clear the client cache before install, to use the minimal amount of space and free up space that may have been used for deployments that day, especially if the machine was freshly deployed, whee this is usually an issue. The second thing was to temporarily increase the cache size for the install with a silent required application, then reset/leave it to the SCCM policy afterward, since these apps are very rare.
For both of these things, I used my trusty friend PowerShell to load the SCCM client management COM object, then expand or clear the client content. Big thanks to both [OzThe2](https://fearthemonkey.co.uk/how-to-change-the-ccmcache-size-using-powershell and kittiah on reddit for the info, near enough just altered things into functions to make my deployment tidier.
Here’s the clean cache script merged into the function. For the cache size script, see here:
#Requires -RunAsAdministrator

Param (
    [Parameter()]
    [int]
    $OlderThan = 30
)

function Clear-CCMCache {
    <#
        .Synopsis
            Clears the content from the CCMCache.

        .DESCRIPTION
            Clears the content from the CCMCache.
            If no parameters are supplied then the cache is completely cleaned.

            To use this in Configuration Manager, on the Programs tab on the Deployment Type, set the 'Program' to be:

            Powershell -ExecutionPolicy Bypass -File .\Clear-CCMCache.ps1 -OlderThan 30

            The number after -OlderThan reflects the age of the CCM cache content to clear.
            If you leave out the -OlderThan parameter then all cache will be cleared.

        .EXAMPLE
            Clear-CCMCache -OlderThan 2

            Clears the cache data older than 2 days

        .NOTES
            Author: David Green
            Credit: https://www.reddit.com/r/SCCM/comments/4mx9h9/clean_ccmcache_on_a_regular_schedule/d3z8px0/?context=3
    #>

    [CmdletBinding()]
    Param (
        [Parameter()]
        [int]
        $OlderThan
    )

    if ($OlderThan) {
        $TargetDate = (Get-Date).AddDays($OlderThan * -1)
    }
    else {
        $TargetDate = Get-Date
    }

    # Create Cache COM object
    $CCM = New-Object -ComObject UIResource.UIResourceMgr
    $CCMCache = $CCM.GetCacheInfo()

    # Enumerate all cache items, remove any not referenced since $targetDate from the CCM Cache
    $CCMCache.GetCacheElements() | ForEach-Object {
        if ($_.LastReferenceTime -lt $TargetDate) {
            $CCMCache.DeleteCacheElement($_.CacheElementID)
        }
    }

    Write-Verbose -Message 'Updating registry.'

    # Create the registry key we will use for checking last run.
    $RegistryKey = 'HKLM:\System\CCMCache'
    New-Item -Path $RegistryKey -Force

    # Add size that CCMCache was changed to in MB
    $Item = @{
        Path         = $RegistryKey
        Name         = 'LastCleared'
        Value        = (Get-Date -Format 'dd/MM/yyyy HH:mm:ss').ToString()
        PropertyType = 'String'
        Force        = $true
    }

    New-ItemProperty @Item

    Write-Verbose -Message 'Done.'
}

# Script entry point
Clear-CCMCache -OlderThan $OlderThan
05 Jun 2018
Following on from my recent module writing work, i’ve been using a little trick in some of my PowerShell modules to store a small amount of state that persists as long as the module is loaded. I’ve been primarily using this strategy as a way to manage connections for SharePoint and REST services.
My example here is a small one derived loosely from a SharePoint Client-Side Object Model (CSOM) module I use and maintain. Essentially, in the module .psm1 file the variable is defined and then used by a couple of functions to set, get and clear the connection data using the $script:variable scoping, as shown below:
Note: You need the SharePoint Online PowerShell module for the SharePoint DLLs!
$Assemblies = @(
    "$env:ProgramFiles\SharePoint Online Management Shell\Microsoft.Online.SharePoint.PowerShell\Microsoft.SharePoint.Client.dll"
    "$env:ProgramFiles\SharePoint Online Management Shell\Microsoft.Online.SharePoint.PowerShell\Microsoft.SharePoint.Client.Runtime.dll"
    "$env:ProgramFiles\SharePoint Online Management Shell\Microsoft.Online.SharePoint.PowerShell\Microsoft.Online.SharePoint.Client.Tenant.dll"
)

Add-Type -Path $Assemblies -Verbose
# SharePoint connection states
[System.Diagnostics.CodeAnalysis.SuppressMessage('PSUseDeclaredVarsMoreThanAssigments', '')]
$Connection = New-Object System.Collections.ArrayList

Function Connect-SharePoint {
    [CmdletBinding()]
    Param (
        [Parameter(Mandatory)]
        [PSCredential]
        $Credential,

        [Parameter(Mandatory)]
        [string]
        $Uri,

        [parameter()]
        [switch]
        $PassThru
    )

    # Login
    $SPContext = New-Object Microsoft.SharePoint.Client.ClientContext($Uri)
    $SPContext.Credentials = New-Object Microsoft.SharePoint.Client.SharePointOnlineCredentials(
        $Credential.UserName,
        $Credential.Password
    )

    try {
        $SPContext.ExecuteQuery()
        $null = $Script:Connection.Add($SPContext)

        if ($PassThru) {
            $SPContext
        }
    }
    catch {
        Write-Error "Error connecting to SharePoint."
    }
}

Function Get-SharePointConnection {
    [CmdletBinding()]
    Param (
        [parameter()]
        [string]
        $Site
    )

    if ($Site) {
        $Script:Connection | Where-Object -Property URL -eq -Value $Site
    }
    else {
        $Script:Connection
    }
}

Function Disconnct-SharePoint {
    [CmdletBinding(DefaultParameterSetName = 'Site')]
    Param (
        [Parameter(
            Mandatory,
            ParameterSetName = 'Site'
        )]
        [string]
        $Site,

        [Parameter(
            ParameterSetName = 'All'
        )]
        [switch]
        $All
    )

    if ($PSCmdlet.ParameterSetName -eq 'Site') {
        $Disconnect = Get-SharePointConnection -Site $Site

        if ($Disconnect) {
            $Script:Connection.Remove($Disconnect)
        }
        else {
            throw "No connection for site $Site found."
        }
    }

    if ($PSCmdlet.ParameterSetName -eq 'All') {
        $Script:Connection = New-Object System.Collections.ArrayList
    }
}
Anyways, hopefully this helps for managing connections, REST auth tokens and a few other little scenarios. I’d be wary of using this approach too often for things like modifying function or module states, as it’s not really the one function for a job (the UNIX way) most PowerShell users might expect.
28 Apr 2018
I’ve been working with VSTS a lot recently as a source management solution. Rather than build and distribute my modules through a file share or some other weird and wacky way, I thought i’d try to use VSTS Package Management to run myself a PSGallery-alike, without running PSGallery! This is related to another coming-soon blog post about building and running a cloud platform business rule compliance testing solution using the VSTS hosted build runner too.
All of this was to work towards to run things in a little more of a continuous integration (CI) friendly way, hopefully making a start towards a release pipeline model for cloud service configurations.
Getting Started
So i started with [this great guide](https://roadtoalm.com/2017/05/02/using-vsts-package-management-as-a-private-powershell-gallery on how to do it manually, creating pakages and pushing them to VSTS Package Management. This works great, but I wanted to close the loop by automatically building my module, along with packing and pushing my nuget packages to VSTS. Here’s how I did it…
Generating the module manifest and nuspec file
You don’t have to generate both automagically, I suppose you could generate the nuspec from the module manifest, which would be quite straightforward. My way is not the only way :) Anyways, based on all the reorganising I do of my modules, it’s easier to generate both so I don’t have to worry about the module manifest file list or the cmdlets/functions/aliases to export.
I use the a project structure like the one used in the Plaster module (since that’s usually my starting point!). This means that a rough module structure looks like this:
\Module
|-\release (.gitignored)
|-\src
| |-Module.nuspec (.gitignored)
| |-Module.psd1   (.gitignored)
| |-Module.psm1
|
|-\test
| |-testfile.test.ps1
|
|-CHANGELOG.md
|-build.manifest.ps1
|-build.ps1
|-build.psake.ps1
|-build.settings.ps1
|-README.md
|-scriptanalyzer.settings.psd1
As you can see, most of those files look pretty much identical to those you get from the Plaster NewModule example with one or two exceptions. The major one is build.manifest.ps1 which is the script I use to build the manifest and stitch together all the pieces defining the module. This script gets called as part of the build and creates two files shown in the above structure, Module.nuspec and Module.psd1.
Here’s the content of this file, I’ve also used it in an example module hosted in GitHub here.
$ModuleName = (Get-Item -Path $PSScriptRoot).Name
$ModuleRoot = "$PSScriptRoot\src\$ModuleName.psm1"

# Removes all versions of the module from the session before importing
Get-Module $ModuleName | Remove-Module
$Module         = Import-Module $ModuleRoot -PassThru -ErrorAction Stop
$ModuleCommands = Get-Command -Module $Module
Remove-Module $Module

if ($ModuleCommands) {
    $Function = $ModuleCommands | Where-Object { $_.CommandType -eq 'Function' -and $_.Name -like '*-*' }
    $Cmdlet = $ModuleCommands   | Where-Object { $_.CommandType -eq 'Cmdlet' -and $_.Name -like '*-*' }
    $Alias = $ModuleCommands    | Where-Object { $_.CommandType -eq 'Alias' -and $_.Name -like '*-*' }
}

Push-Location -Path $PSScriptRoot\src
$FileList = (Get-ChildItem -Recurse | Resolve-Path -Relative).Substring(2) | Where-Object { $_ -like '*.*' }
Pop-Location

$ModuleDescription = @{
    Path                = "$(Split-Path -Path $ModuleRoot)\$((Get-Item -Path $ModuleRoot).BaseName).psd1"
    Description         = 'A PowerShell script module.'
    RootModule          = "$ModuleName.psm1"
    Author              = 'David Green'
    CompanyName         = 'tookitaway.co.uk'
    Copyright           = '(c) 2018. All rights reserved.'
    PowerShellVersion   = '5.1'
    ModuleVersion       = '1.0.0'
    # RequiredModules   = ''
    FileList            = $FileList
    FunctionsToExport   = $Function
    CmdletsToExport     = $Cmdlet
    AliasesToExport     = $Alias
    Tags                = $ModuleName
    # VariablesToExport = ''
    # LicenseUri        = ''
    # ProjectUri        = ''
    # IconUri           = ''
    ReleaseNotes        = Get-Content -Path "$PSScriptRoot\CHANGELOG.md" -Raw
}

[string]$Tags = $ModuleDescription.Tags | Foreach-Object { "'$_' " }

[xml]$ModuleNuspec = @"
<?xml version="1.0"?>
<package>
  <metadata>
    <id>$ModuleName</id>
    <version>$($ModuleDescription.ModuleVersion)</version>
    <authors>$($ModuleDescription.Author)</authors>
    <owners>$($ModuleDescription.Author)</owners>
    <requireLicenseAcceptance>false</requireLicenseAcceptance>
    <description>$($ModuleDescription.Description)</description>
    <releaseNotes>$(Get-Content -Path "$PSScriptRoot\CHANGELOG.md" -Raw)</releaseNotes>
    <copyright>$($ModuleDescription.Copyright)</copyright>
    <tags>$Tags</tags>
  </metadata>
</package>
"@

New-ModuleManifest @ModuleDescription
$ModuleNuspec.Save("$(Split-Path -Path $ModuleRoot)\$((Get-Item -Path $ModuleRoot).BaseName).nuspec")
The build script
This next small example is from build.ps1, showing where the manifest build is called, along with pre-installing any prerequisites needed, as generating the manifest requires me to import the module. I don’t currently alter the build.psake.ps1 file, as I want to be able to easily consume any updates to the psake script (although it should really be in the build.settings.ps1 in that case!).
[CmdletBinding()]

Param (
    [Parameter()]
    [string[]]
    $Task = 'build',

    [Parameter()]
    [System.Collections.Hashtable]
    $Parameters,

    [Parameter()]
    [switch]
    $InstallPrerequisites
)

$psake = @{
    buildFile  = "$PSScriptRoot\Build.psake.ps1"
    taskList   = $Task
    Verbose    = $VerbosePreference
}

if ($Parameters) {
    $psake.parameters = $Parameters
}

# Prerequisites
if ($InstallPrerequisites) {
    if (-not (Get-PackageProvider -Name NuGet -ErrorAction SilentlyContinue)) {
        Install-PackageProvider -Name NuGet -Force -Scope CurrentUser
    }

    'pester', 'psake' | ForEach-Object {
        Install-Module -Name $_ -Force -Verbose -Scope CurrentUser -SkipPublisherCheck
    }
}

. $PSScriptRoot\Build.manifest.ps1
Invoke-psake @psake
OK! so hopefully you can implement this file to build your manifest and nuspec file, so you could run your nuget pack and nuget push, then call it a day, right? Kind of… But wouldn’t it be easier for someone else to do the pack and push? Enter VSTS Package Management! You’ve been committing all this to source control right?!
Building the steps for ‘pack and push’
To build the steps for pack and push, you need to have the following prerequisites in place (i’m assuming you’ve already got git, or the first half of this post may have missed the mark):
Once you’ve got those installed and read through the getting started with VSTS stuff to get a good grounding in what it’s all about, We can push the code to the remote origin, then we can build… the build!
We can add the remote git server with:
git remote add <remote name> <repository url>
Then initialise the empty remote server with all our content and history using:
git push -u <remote name> -all
Now we should have our module in VSTS, looking a little lonely, just waiting to get built! We can go to Build and Release > Packages to start the process, but we might need to add an extension license before we do that.

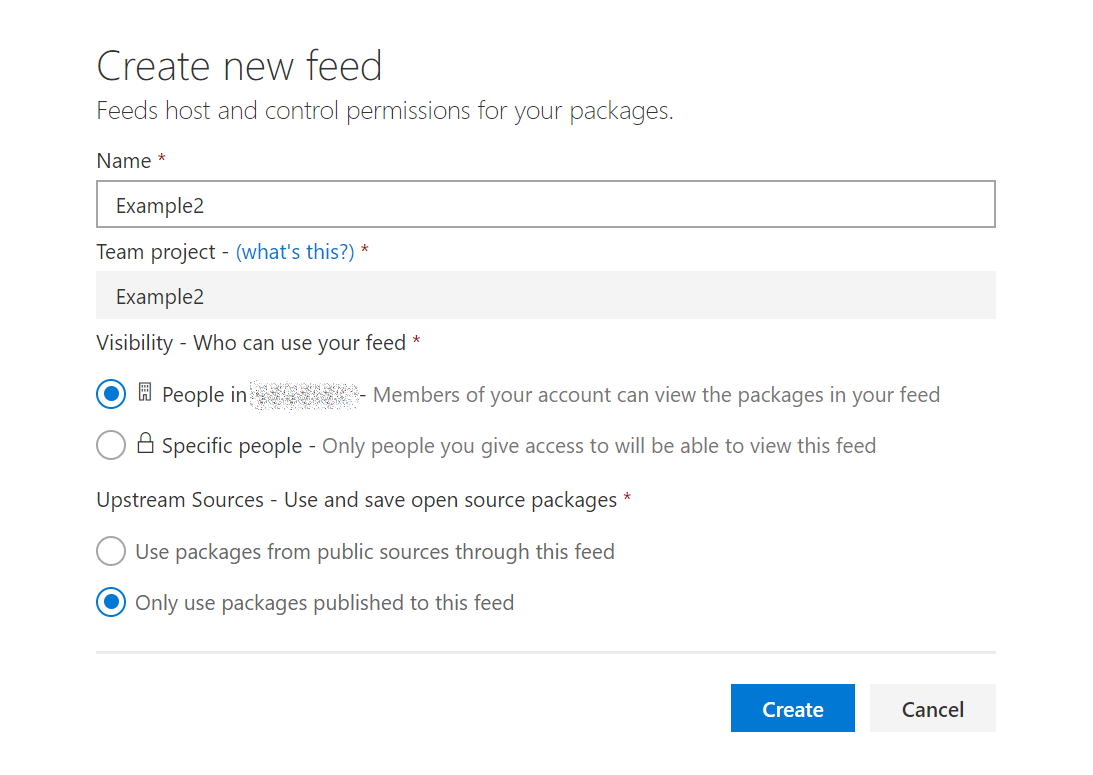
Click your user, then click Manage extensions and apply the Package Management license. After that, we can go back to the Packages page to create the new feed, here’s a screenshot.

Now we can navigate to Builds and click + New definition to create a build definition. We’ll use VSTS Git and use an empty build definition.

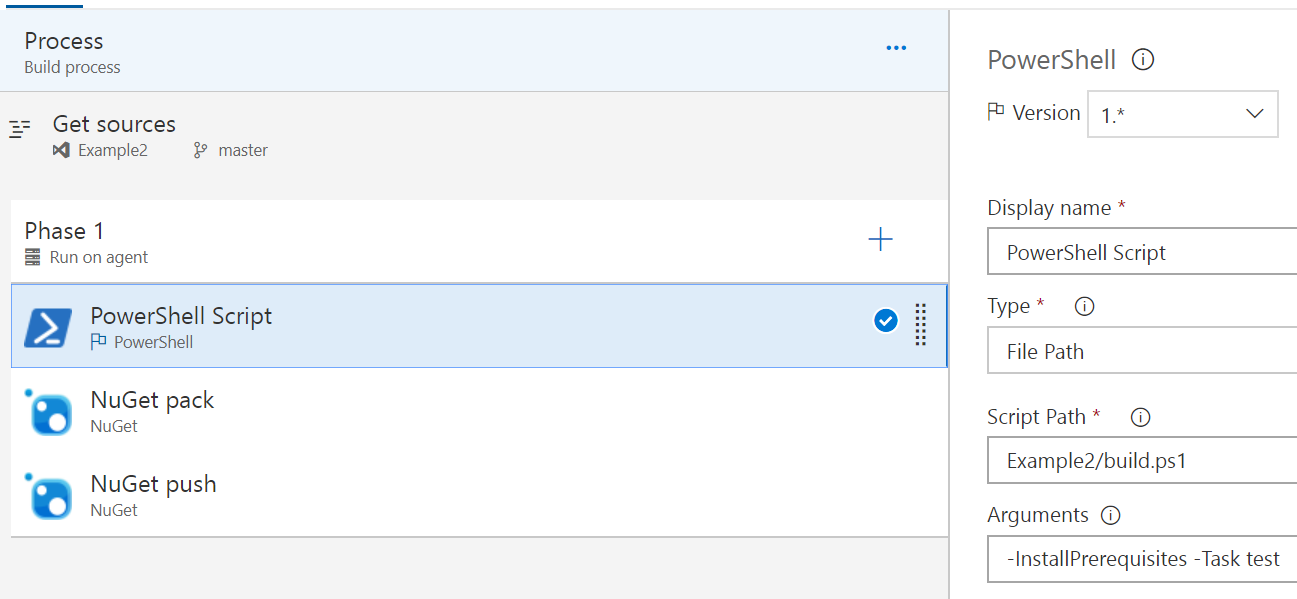
We’ll create three steps, a simple build for the module! We’re runing build.ps1, which will install the prerequisites like Pester and psake if needed, which for the VSTS build runner, we will require. Then we can build the module into the Release folder and give it a good test before we give it to nuget to pick up in the next step.

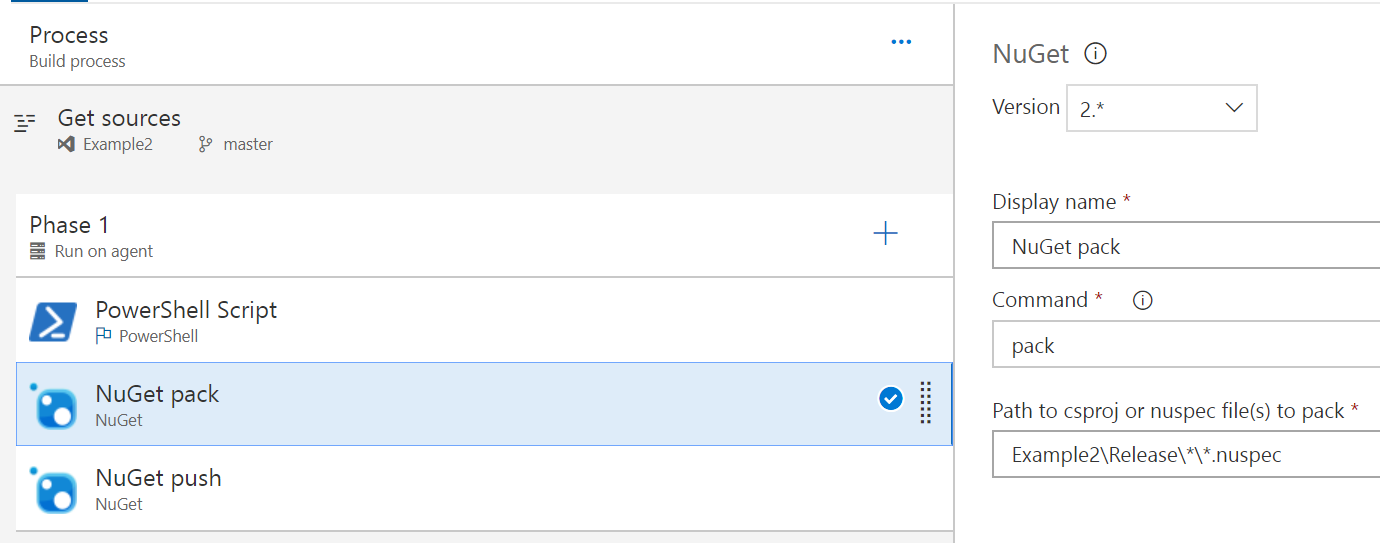
This step is almost entirely as-is, just pointing to the expected path of the Example2.nuspec file to grab and pack up.

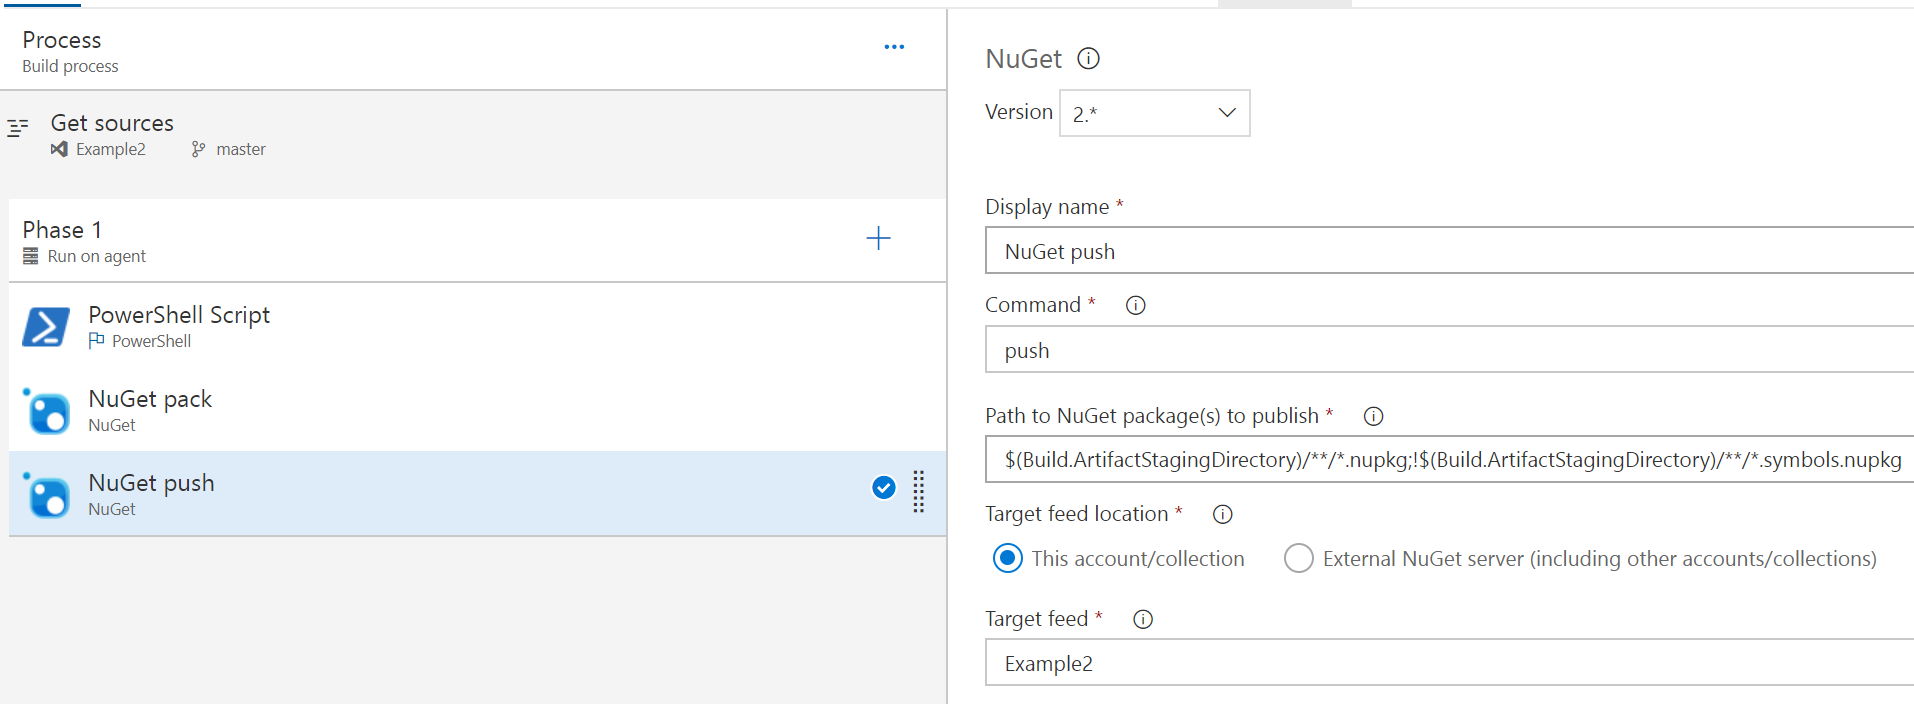
This step again is almost-default and just points to the target feed, nothing else has been changed. You could collect the test results as well, along with some other things to make sure you’ve collected all the good data about the build, but that’s outside the scope of this post.
So now we’ve got a module, it’s built, it’s tested, it’s packed and pushed and ready to go! So how do we use it?
Installing modules from the feed
Remember the package feed we created earlier? Now the feed is created and we’ve pushed a package to it, it’s got a use! If you navigate back to the Build and Release > Packages, then click Connect to feed, you can then copy the Package source URL, changing nuget/v3 to nuget/v2 which will look something like this:
https://<VSTSName>.pkgs.visualstudio.com/_packaging/<TeamName>/nuget/v2
This is the Repository URL for the PSRepository we’ll want to register, the only other detail we need will be the Personal Access Token (PAT), details of how to generate one can be found here (accessible through your profile security page).
Basically you an use anything for your username, as long as the password is your PAT, it’ll connect and let you seach, download and install packages from this feed.
$Cred = Get-Credential

$Splat = @{
    Name               = 'PowerShell'
    InstallationPolicy = 'Trusted'
    SourceLocation     = 'https://<VSTSName>.pkgs.visualstudio.com/_packaging/<TeamName>/nuget/v2'
    Verbose            = $true
    Credential         = $Cred
}

Register-PSRepository @Splat

Install-Module -Repository PowerShell -Name Example2 -Scope CurrentUser -Credential $Cred -Verbose
Final thoughts
The only issue I currently have is that since the package feed is immutable, you have to make sure you have upped the module version in order to get the push to work, or you end up with a build that works, but an error at the end like:
Error: An unexpected error occurred while trying to push the package with VstsNuGetPush.exe. Exit code(2) and error(The feed already contains ‘Example2 1.0.0’.)
I’m unsure how to get my CI process (build + test) running automatically, while also having a build test and release working automatically when I bump the version number. I’ll continue to discover new things though and post once I figure it out! Alternatively, if you already know how, please share! :)
And that’s it! Hopefully this give you some good information on working with your own PowerShell module CI solutions within VSTS and Package Management.


