13 Jun 2017
Another week, another quick script!
Very occasionally, we have a problem with Remote Desktop User Profile Disks (UPDs) getting stuck mounted when there’s a problem with a RDS session host and it either reboots or crashes. Here’s a little script I’ve written to show the open VHDX files on a file server or SOFS cluster to find out which RDS host the VHDX is mounted on. Because user profile disks are quite fragile, there is a lot of odd behaviour around when a host crashes. When users log in again, the profile disk may mount on the new host, but the user always seems to receive a temporary profile and the disk gets stuck even after the user is logged out.
After this, you can then take action to unmount it and then deal with the disk. Anyways, here’s the script!
Script to be posted, sorry!
19 Apr 2017
Something I do a lot of the time to make people’s experience with PowerShell easier, especially when they are new, or reluctant to learn is to write argument completers. A lot of the time, I write them for advanced functions and cmdlets I build, but I also find the odd occasion where I build them for existing commands.
I can’t believe I haven’t talked about this before, but I started doing this after watching this awesome video from the PowerShell Global summit by the awesome Rohn Edwards.
I always make sure to ship these even if 99% of the time the script is running completely automated because they are easy to write and, when you find you need them, the convenience is just awesome. Since these are PS v5 commands, you can always make sure you skip these when running on lower versions if you don’t want to require v5 as the minimum shell version, since they are entirely optional.
Probably the biggest time saver argument completers I’ve ever written are for the MSOnline Office 365 PowerShell module, as being able to tab through UPNs (and sometimes tenant IDs, once you start to recognise them :S) is absurdly useful.
These particular argument completers take a dependency on a little function to test whether you’re connected to Office 365, but there are other ways to do this as well. This function is also included below.
Anyways, because they’ve saved me a lot of time, here they are. Hopefully they will save you some time too!:
Completer 1
Completer 2
23 Mar 2017
Last week we ran into a small issue with one of our first Server 2016 deployments when using it as a Remote Desktop Session Host (RDSH) that took us a little while to figure out.
The Problem
When we added the machine to the RDSH collection, the machine would then fail to load any Appx apps (including the start menu (ShellExperienceHost!). We initially had a bit of trouble targeting the cause, as other than adding the machine to the session collection, nothing had changed.
Some Troubleshooting
We did find some events saying the application couldn’t be installed in the application log (for the first login only), but also every time in the TWinUI log. This gave me a good idea of where the problem lay, but we followed through looking at the logs to see if it would give us some more information.
This log is found in the following places:
Applications and Services Logs\Microsoft\Windows\Apps\Microsoft-Windows-TWinUI/Operational
or
%SystemRoot%\System32\Winevt\Logs\Microsoft-Windows-TWinUI4%Operational.evt
The events looked like the following:
Log Name: Microsoft-Windows-TWinUI/Operational
Source: Microsoft-Windows-Immersive-Shell
Date: 20/03/2017 14:08:32
Event ID: 5985
Task Category: (5961)
Level: Error
Keywords:
User: DOMAIN\user
Computer: RDSH.domain.local
Description:
ActivateApplicationForContractByAppIdAsUserWithHost of the app Microsoft.Windows.ShellExperienceHost_cw5n1h2txyewy!App for the     Windows.Launch contract failed with Install failed. Please contact your software vendor.
We also tried trusty ProcMon (nothing obviously access denied or wrong), all that would happen WerFault.exe would appear when trying to run ShellExperienceHost.exe manually.
Log Name: Application
Source: Application Error
Date: 20/03/2017 13:55:19
Event ID: 1000
Task Category: (100)
Level: Error
Keywords: Classic
User: N/A
Computer: RDSH.domain.local
Description:
Faulting application name: ShellExperienceHost.exe, version: 10.0.14393.447, time stamp: 0x5819bf85
Faulting module name: Windows.UI.Xaml.dll, version: 10.0.14393.953, time stamp: 0x58ba5c3d
Exception code: 0xc0000409
Fault offset: 0x00000000000521d0
Faulting process id: 0xbe0
Faulting application start time: 0x01d2a1819c994d20
Faulting application path: C:\Windows\SystemApps\ShellExperienceHost_cw5n1h2txyewy\ShellExperienceHost.exe
Faulting module path: C:\Windows\System32\Windows.UI.Xaml.dll
Report Id: 4c97f524-b5e8-44c0-b03a-2b939c6924d2
Faulting package full name:
Faulting package-relative application ID:
A Clue
We then looked in the next place we usually look when this kind of thing goes on, even though there were no changes to the machine, other than adding the machine to the session collection.
You guessed it, the AppLocker logs! We saw a few events like this:
Log Name: Microsoft-Windows-AppLocker/Packaged app-Deployment
Source: Microsoft-Windows-AppLocker
Date: 20/03/2017 14:08:22
Event ID: 8026
Task Category: None
Level: Error
Keywords:
User: DOMAIN\user
Computer: RDSH.domain.local
Description:
No packaged apps can be executed while Exe rules are being enforced and no Packaged app rules have been configured.

Log Name: Microsoft-Windows-AppLocker/Packaged app-Execution
Source: Microsoft-Windows-AppLocker
Date: 17/03/2017 17:13:35
Event ID: 8027
Task Category: None
Level: Error
Keywords:
User: DOMAIN\user
Computer: RDSH.domain.local
Description:
No packaged apps can be executed while Exe rules are being enforced and no Packaged app rules have been configured.
Turns out the issue was Applocker blocking the install and the run of the app, which is odd since it wasn’t affecting us before. This problem doesn’t seem to affect administrative users that log on before the machine is added to the session collection (which I believe is the expected behaviour). The unexpected behaviour is that AppLocker policies appear to be enforced for all users when the server is in a session host collection, which in our case prevented the start menu from working.
The Solution
A simple fix in the end.
We added the default Appx signed apps allowed rule to our Applocker Policy, however you could make sure just the required applications (like ShellExperienceHost) are allowed.
I’m glad we got to the bottom of it reasonably quickly and I hope that this post might help some others with the same issues.
06 Oct 2016
I’ve done a bit with the User State Migration Tool (USMT) for both migrating and archiving user data. Instead of using the USMT integration process with SCCM, i needed something a bit more flexible that would potentially allow profile restores to multiple machines.
One of the scenarios I needed to support was user initiated backup and restore of the current user profile. To support this and meet the requirements, I needed the following things:
- Multiple profile backups must be permitted. If a user performs a profile backup and doesn’t restore the data, the user must be able to backup their profile again without requiring outside intervention.
- Previous profile backups should be stored for a time, as users may forget to restore or files may need to be recovered from the USMT store.
- When a restore is done, the latest profile backup for that user should be restored. This allows previous backups to exist for IT to recover files from if required.
- Users don’t necessarily have administrative rights, so the solution must run as the local system to backup the current user.
The current script is designed to run either as an SCCM application, or from a task sequence to get the most recent logged on user and backup that profile only, along with the SYSTEM profile (to catch files stored in the root C:, as an example). Restore is to work the same way and unpack the most recent profile backup onto the destination machine it is run on.
Backing up the current user profile when running as SYSTEM presented a bit of a challenge, as the script will need to be told to backup just the logged in user. In order to give this information to USMT, we need to investigate the Win32_UserProfile WMI class, to see who’s logged on. It does this by being passed the domain SID of users that might log onto the machine, then filtering the instance of Win32_UserProfile to get the most recently logged on username. From there, you can store the user profile, or select the most recent profile backup for restore.
Here’s two scripts I call from task sequences to give user initiated scan and load tasks. This gives the users the ability to self-service their own backups and restores with no intervention from IT.
Scripts
13 Sep 2016
Lately I’ve been working on a little more SCCM operating system deployment work and I’ve got an updated toolset for configuring and updating UEFI firmware for HP machines easily in a task sequence. This is a reasonably long post, so bear with me.
A lot of the same techniques from my earlier posts like this on the subject apply. We are still using HPBIOSUPDREC, BiosConfigUtility and an SCCM package for the source files. I’ve updated the batch files to take an argument for the configuration or update file, as well as the previous architecture detection. The good thing about this method is that it supports all current HP laptop, desktop and workstation models with no change, you just give the update file, or the configuration as an argument and away you go.
I considered using PowerShell for this, however it takes a little while to start in WinPE and unless I add more logic to the process for particular models or action types, I don’t see the need to convert it yet.
I’ve set up the package for HP machines I need to configure and update as follows:
SCCMPackages\HP-UEFI\
    68ICF.CAB                (UEFI firmware - EliteBook 8x70p)
    BiosConfigUtility.exe    (BIOS config utility - x86)
    BiosConfigUtility64.exe  (BIOS config utility - x64)
    BIOSPW.bin               (Encrypted BIOS password)
    ConfigureUEFI.cmd        (UEFI config command file)
    EliteDesk800G2-Win7.cfg  (UEFI configuration - Win 7)
    EliteDesk800G2-Win10.cfg (UEFI configuration - Win 10)
    EliteBook8x0G3-Win7.cfg  (UEFI configuration - Win 7)
    EliteBook8x0G3-Win10.cfg (UEFI configuration - Win 10)
    EliteBook8x70p-Win7      (UEFI configuration - Win7)
    N75_0110.bin             (UEFI firmware - EliteBook 8x0 G3)
    N21_0219.bin             (UEFI firmware - EliteDesk 800 G2 SFF)
    UpdateBIOS.cmd           (UEFI update command file HPqflash models)
    UpdateUEFI.cmd           (UEFI update command file HPBIOSUPDREC models)
A sample set of files for all of this can be found on GitHub, except the HP binaries and firmware, which need to be downloaded from HP.
You can follow the larger package format, with all models together, or spread the update and configuration files over multiple packages, whichever suits your requirements best.
You may notice that I’ve included an odd DLL file ‘oledlg.dll’. This is needed to make HPqflash work on WinPE 10 (10.0.10586.0). If you run HPqflash in WinPE 10 without it, you get an exit code of -1073741515 (0xC0000135), which means a DLL needed for the program is missing.
I did a bit of investigation with procmon on a full windows system and found oledlg.dll was required, but missing from WinPE. I put this DLL in the same folder next to HPqflash and all was good!
Both ConfigureUEFI.cmd and UpdateUEFI.cmd are general for all models using HPBIOSUPDREC and the HP BIOS config utility and look like this:
ConfigureUEFI
UpdateUEFI
There’s also a slightly different version for deploying updated firmware, if you’re still using HPqflash:
HPqFlash
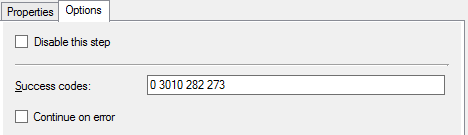
We can use the same SCCM ’Run command line’ task we used in the past for this, with a little tweak to run the command file with the right update or configuration. This is done in the same way as before, with the extra exit code for successful completion.
This is the configure command line:
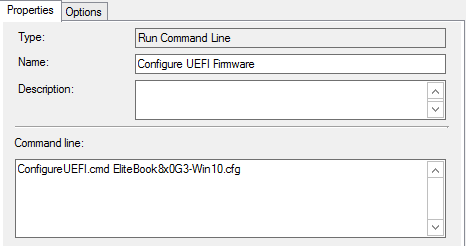
Followed by the update command line, along with the success exit codes shown.
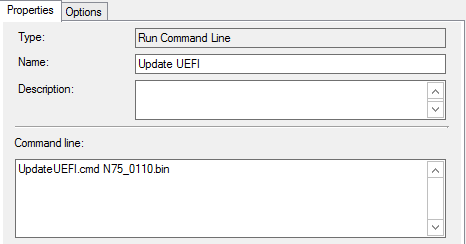
The update command line needs to follow the configure step if as it requires a password bin file.
Hopefully this has been helpful updating things in the journey to support newer HP models.